

How To Keep Fence Pickets Level
A pace-past-pace guide on how to install debate pickets on a wooden cedar contend.
Your lawn is your personal retreat from hectic days.
It's where you soak up the rays of the sun, constitute your seeds for summer salads and watch your kids dig up worms from under piddling rocks y'all never noticed before.
But during all this fourth dimension yous spend outdoors, in that location's one thing that you try to avoid looking too closely at.
Your faded, slightly shaky, and definitely outdated wooden contend.
Well, it'southward fourth dimension to give your fence a facelift!
And if you lot're already calculating how much it will cost you to supplant the entire fence, cease right there.
You lot can hands and affordably renew your fence by installing cedar pickets on the current fence!
Our backyard fence has had a big transformation over the by months; the difference is similar dark and day.

Before the repairs, our debate was a sad sight and sections of it were falling apart. We finally decided to rebuild the whole thing.
I shared the process we used to rebrace all the rails of our argue previously and today, we are adding the pickets.
In the following weeks, I volition be sharing tutorials on building a gate with a pergola over information technology.
To start, here is a listing of the supplies and tools we used.
Disclosure: This post contains some affiliate links or referral links for your convenience. It is a manner for this site to earn advertising commissions by advertisement or linking to certain products and/or services, click here to read my full disclosure policy .
SIDE NOTE: Possibly you lot have a local lumber store that has different sizes of cedar planks. We found this out towards the end of our project when we needed some 10 ft boards.
Before nosotros get-go, let's show yous how nosotros stock-still that problem with the bowing pickets.
Calculation A Eye Track:
When we started this project, we planned to continue the same debate structure as earlier. Unfortunately, a few weeks subsequently nosotros were done, nosotros had to come back and fix all the pickets. Yes, ALL of them!
After installing all the pickets, we started to notice that a lot of them were bowing away from the debate. So we decided to add some other rails to the fence, right in the middle, to forestall the pickets from bowing.
We even had to remove some of the pickets to add together this new rails, so PLEASE salvage yourself some time and install a middle rail before the pickets!
We installed the centre rail the aforementioned mode every bit the other 2 rails.
We braced the one cease of the post with several 5″ ii×four pieces (we cutting 2 blocks for each rail). Since we're calculation a heart brace, we have to brace the middle rail to the vertical postal service or boards. To aid brace the rail, we used the 5" block.
After adding one five″ piece, nosotros cut a 2×4 board to be the heart rail and measured from post to caryatid. We then prepare the middle track into place, took our level and adjusted the lath until it was straight.
We marked the lesser where the other side of the middle rail hit the mail (or brace). This is the marking to identify the other v″ two×4 brace piece.
Nosotros secured the 5″ slice with screws (just like before); then, nosotros attached the center rails and secured with two 3.five″ screws. We continued this rail from mail to post (or mail to brace in our case) for the whole fence.
Hither is an example of what I am talking about.

After rebracing and installing the rail, we were fix to install the pickets. We decided that we did not want our pickets right by each other. Some of the pickets are not equally square equally you would hope so we chose to leave a piddling gap in betwixt the pickets. This would give united states of america some wiggle room and we liked the look ameliorate.
We decided on a 1/four″ gap between each board. To make things piece of cake, we used a chip 1/4″ strip of MDF we had on hand from our kitchen cabinet project.
Some other thing I would suggest is to leave at least a 1/2″ gap (I liked it more than betwixt 1″-2″) at the bottom of the pickets to the basis.
To install the pickets the process was simple but to make it fifty-fifty easier, yous will need two people. We placed the 1/iv″ board as a spacer betwixt the boards.
QUICK TIPS FOR A Straight Contend:
- After your start or second picket, have your level and make sure the boards are level as you continue. Nosotros had to set up a big section because we didn't do this and it does NOT look good. And don't simply practice it once – make sure to check the level nearly every ten pickets. If they are not level, adjust the space between the boards and if you really demand to adjust, exercise this gradually (over a couple of pickets).
- Another challenge was trying to keep the top of the pickets level. You could utilise a modest piece of rope only our ground was sloping. What we did was eyeball it. When things started to slope, we gradually sloped with the ground (about a one/4″ pre-picket).
- There were some places where we added some dirt to even out the gap between the pickets and footing.
- Too, we never moved our boards up; instead, we would cutting the lesser of the picket if it was too long.
INSTALLING PICKETS:
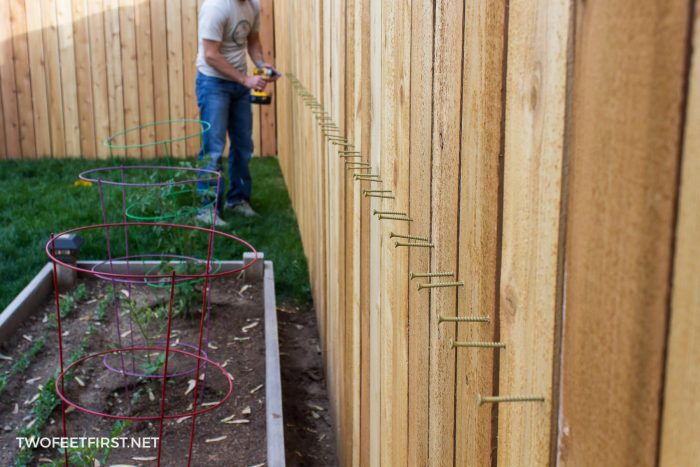
To install a watch, we would identify the 1/iv″ spacer confronting the final scout and then place the next spotter right confronting the spacer. I of usa (me) would concord the picket into place, while the other would cheque the level (ground space and elevation of the picket). My husband did this considering he is taller than me!
When everything looked adept, he took the drill with a drill fleck and pre-drilled ii holes into the elevation rail and two into the bottom track. So, he added 2″ deck screws into the pre-drilled holes, existence careful well-nigh non drilling too far into the picket with the screw.

Next, we moved to the next picket, repeating the same procedure. Don't worry about the center runway just yet – you'll take plenty of fourth dimension to practice it later.
We found that we needed to cutting some of the pickets to fit in the stop of the space. To practise this, we measured the gap and subtracted 1/2″ (sometimes the meridian and bottom gap tin can be different so measure both). After we marked a sentry with the measurement, I took a round saw and cut along the line. This gave us our adjusted picket.
Once all the pickets are installed, have one person pre-drill two holes along the eye rails for all the pickets. Then, have someone else follow past drilling the 2″ screws into identify. We did this in sections but it made adding the screws then much faster!
And that is how we re-braced our wooden debate and installed new cedar pickets. What exercise you lot think?
How about a before and afterward once more?


The deviation is amazing, correct? Stay tuned for how to build a simple pergola over a gate, build a wooden gate, stain/waterproof a fence, and the cost suspension-downward.
Anyone else need to redo their fence?
Prep Time thirty minutes
Active Time ane day
Full Fourth dimension 1 24-hour interval xxx minutes
Difficulty Moderate
Estimated Cost $$$
Materials
- cedar pickets (we used near #320)
- 2″x4″ cedar boards
- 3.5″ deck screws (we purchased two of these big boxes)
- 2″ deck screws (we purchased three of these large boxes)
- scrap one/4″ board
Tools
- miter saw
- circular saw
- level
- drill
- pencil or pen
- rubber spectacles
- face mask (for dust)
- ear protection
Instructions
- Make sure the framing of the fence is stable and it has a top, center, and bottom runway to attach the pickets into place (see how to build the framing of a fence with the link).
- Install the pickets by attaching each board to the top. center, and bottom rail with two screws at each rail.
- Pre-drill the holes then attach the pickets with two" screws.
- Employ a 1/iv" spacer board to give you the gap between the pickets.
Save Save
Save Salvage
Source: https://www.twofeetfirst.net/rebuilding-a-fence-part-2/
0 Response to "How To Keep Fence Pickets Level"
Post a Comment